Gaining Access To The Oculus Developer Database

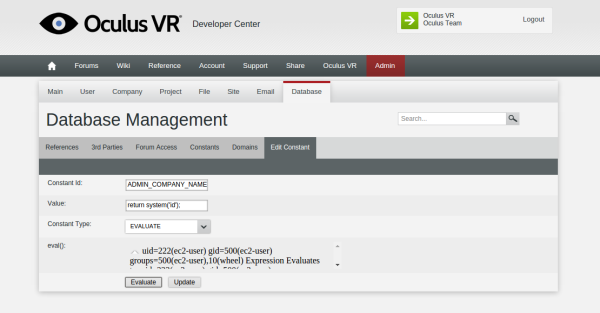
One of the hackers over at Bitquark popped a shell on on the Oculus Developer Portal giving him full reign over the special admin panel inside. If he felt so inclined, this allowed him edit users, modify projects, add news articles, edit the dashboard, upload SDK files, and variety of other goodies.

The process started by using a SQL injector called BSQLi to test out parameters, cookies, and headers. Injecting into the header revealed that the Oculus team members were inserting X-Forwarded-For headers directly into the database without proper escape formatting. This got him in the door, and with a little assistance from sqlmap, the database was enumerated, and a pattern was recognized. Oculus passwords that were stored in the DB were heavily hashed. However, the user session variables remained unprotected. A SQL query was quickly built, the latest admin session was promptly extracted, and then the information was plugged in granting access to the portal. A bit more snooping around uncovered that the AJAX eval() preview script wasn’t secured by a CSRF token which could easily be exploited by a malicious hacker.

The findings were then turned into Facebook who paid the guy $15,000 for the first vulnerability plus the privilege escalation attack. $5,000 was then awarded for each subsequent SQL injection as the admin account takeover vulnerability that was found, giving the guy a nice payout for a week’s worth of work.

Homemade Activity Monitor

A group of developers have uploaded a tutorial on Instructables showing the steps needed to develop a homemade DIY fitness tracker. The design is the second iteration of an Arduino-based wearable smart watch project of theirs. This time around, they opted to focus more on the monitoring system rather than a visual display. It is called the ‘RetroBand’ and records steps taken and calories burned by the user.

The microcontroller used is an Arduino Pro mini 3.3v. Accelerometer and gyro sensors were integrated to capture the movement of the ‘RetroBand.’ A wireless bluetooth module connects to an Android phone which presents the data through a Play Store app complete with graphs included. An enclosure was 3D printed. Everything is powered by a one cell Lithum-Polymer battery. The code for the project can be found on Github, and additional information with a how-to manual is on their website (which is in Korean, but can easily be translated through the browser).

Concrete Castle

Update: 3D Printed Concrete Castle Completed

After two years of dreaming, designing, and doing, [Andrey Rudenko] has finally finished 3D printing his concrete castle. We’re sure a few readers will race to the comments to criticize the use of “castle” as an acceptable descriptor, but they’d be missing the point. It’s been only three months since he was testing the thing out in his garage, and now there’s a beautiful, freestanding structure in his yard, custom-printed.

There are no action shots of the printer setup as it lays down fat beads of concrete, only close-ups of the nozzle, but the castle was printed on-site outdoors. It wasn’t, however, printed in one piece. [Andrey] churned out the turrets separately and attached them later. He won’t be doing that again, though, because moving them in place was quite the burden. On his webpage, [Andrey] shares some insight in a wrap-up of the construction process. After much experimentation, he settled on a layer height of 10mm with a 30mm width for best results. He also discovered that he could print much more than his original estimation of 50cm of vertical height a day (fearing the lower layers would buckle).

With the castle a success, [Andrey] plans to expand his website to include a “posting wall for new ideas and findings.” We’re not sure whether that statement suggests that he would provide open-source access to everything or just feature updates of his future projects.

Wooden supports for concrete bridging.
[Andrey] used wooden supports to print concrete bridges.
We hope the former. You can check out its current format as the Architecture Forum, where he explains some of the construction capabilities and tricks used to build the castle.

His next project, a full-scale livable structure, will attempt to print 24/7 (weather permitting) rather than the stop-start routine used for the castle, which turned out to be the culprit behind imperfections in the print. He’ll have to hurry, though. [Andrey] lives in Minnesota, and the climate will soon cause construction to take a 6-month hiatus until warm weather returns. Be sure to check out his website for more photos and a retrospective on the castle project, as well as contact information—[Andrey] is reaching out to interested parties with the appropriate skills (and investors) who may want to help with the new project.

[via 3ders.org]

[Thanks Brian]

THP Semifinalist: The Medicycle

Despite a seeming lack of transportation projects for The Hackaday Prize, there are a few that made it through the great culling and into the semifinalist round. [Nick], [XenonJohn], and [DaveW]’s project is the Medicycle. It’s a vehicle that will turn heads for sure, but the guys have better things in mind than looking cool on the road. He thinks this two-tire unicycle will be useful in dispatching EMTs and other first responders, weaving in and out of traffic to get where they’re needed quickly.

First things first. The one-wheeled motorcycle actually works. It’s basically the same as a self-balancing scooter; the rider leans forward to go forward, leans back to break, and the two tires help with steering. It’s all electronic, powered by a 450W motor. It can dash around alleys, parking lots, and even gravel roadways.

The medi~ part of this cycle comes from a mobile triage unit tucked under the nose of the bike. There are sensors for measuring blood pressure and oxygen, heart rate, and ECG. This data is sent to the Medicycle rider via a monocular display tucked into the helmet and relayed via a 3G module to a physician offsite.

Whether the Medicycle will be useful to medics remains to be seen, but the guys have created an interesting means of transportation that is at least as cool as a jet ski. That’s impressive, and the total build cost of this bike itself is pretty low.

Video of the Medicycle in action below.


SpaceWrencherThe project featured in this post is a semifinalist in The Hackaday Prize.
Continue reading “THP Semifinalist: The Medicycle”

Hydropower Washing Machine

Hydropower From A Washing Mashine

Living off the grid is an appealing goal for many in the hacker community, perhaps because it can fulfill the need to create, to establish independence, to prepare for the apocalypse, or some combination of all those things. [Buddhanz1] has been living off the grid for awhile now by harnessing power from a nearby stream with an old washing-machine-turned-generator.

He started with a Fisher & Paykel smart drive, which he stripped down to the middle housing, retaining the plastic tub, the stator, the rotor, the shaft, and the bearings. After a quick spot check to ensure the relative quality of the stator and the rotor, [Buddhanz1] removed the stator and rewired it. Unchanged, the stator would output 0-400V unloaded at 3-4 amps max, which isn’t a particularly useful range for charging batteries. By rewiring the stator (demonstration video here) he lowered the voltage while increasing the current.

The key to this build is the inclusion of a pelton wheel—which we’ve seen before in a similar build. [Buddhanz1] channeled the water flow directly into the pelton wheel to spin the shaft inside the tub. After adding some silicon sealant and an access/repair hatch, [Buddhanz1] painted the outside to protect the assembly from the sun, and fitted a DC rectifier that converts the electricity for the batteries. With the water pressure at about 45psi, the generator is capable of ~29V/21A: just over 600W. With a larger water jet, the rig can reach 900W. Stick around for the video after the break.

Continue reading “Hydropower From A Washing Mashine”

Extrinsic Motivation: Smart Antenna Tracker For R/C Aircraft

Long distance FPV (First Person View) flying can be a handful. Keeping a video feed alive generally requires a high gain directional antenna. Going directional creates the chore of keeping the antenna pointed at the aircraft. [Brandon’s] smart antenna tracker is designed to do all that automatically. What witchcraft is this, you ask? The answer is actually quite simple: Telemetry! Many flight control systems have an optional telemetry transmitter. [Brandon] is using the 3DRobotics APM or PixHawk systems, which use 3DR’s 915 MHz radios.

The airborne radio sends telemetry data, including aircraft latitude and longitude down to a ground station. Equipped with a receiver for this data and a GPS of its own, the smart antenna tracker knows the exact position, heading and velocity of the aircraft. Using a pan and tilt mount, the smart antenna tracker can then point the antenna directly at the airborne system. Since the FPV antenna is co-located on the pan tilt mount, it will also point at the aircraft and maintain a good video link.

One of the gotchas with a system like this is dealing with an aircraft that is flying directly overhead. The plane or rotorcraft can fly by faster than the antenna system can move. There are a few commercial systems out there that handle this by switching to a lower gain omnidirectional whip antenna when the aircraft is close in. This would be a great addition to [Brandon’s] design.

A Peach Of A Homemade Parts Tumbler

[Chris] finds the average price of rock tumblers insulting. Almost as insulting, in fact, as prepackaged fruit salad made with Chinese peaches. While there may be little he can do about the peaches, he has given the finger to lapidary pricing by making his own tumbler on the very cheap.

Simply put, he drilled a hole in bottom of the peach vessel and then stuck a threaded rod through it. He held the rod in place with a nut and a washer. After securing the proper permits to source sand and water from his property, he put both in the jar along with some old nails that had paint and crud on them. [Chris] put the rod in the chuck of his drill and clamped the drill in his bench vise. Half an hour later, he had some nice, shiny nails. Make the jump to be amazed and entertained. If you prefer using balls, check out this homemade mill.

Continue reading “A Peach Of A Homemade Parts Tumbler”